Using An ENET Cable To Install EVO ID5/6 LifeTime FSC Code
Using an ENET cable correctly.

Jack Dough
Last Update 3 年前
Initial setup
- Download the Installer Software and save it to your computer- Download Installer Software
- Unzip the downloaded file into any folder on your computer.
- View video showing how to attach the supplied ENET cable to vehicle - Attaching ENET Cable
- View video showing how to use the installer software - Running the Installer Software
- Switch ignition on in the vehicle and connect one end of the ENET cable to the car and the other end to the PC
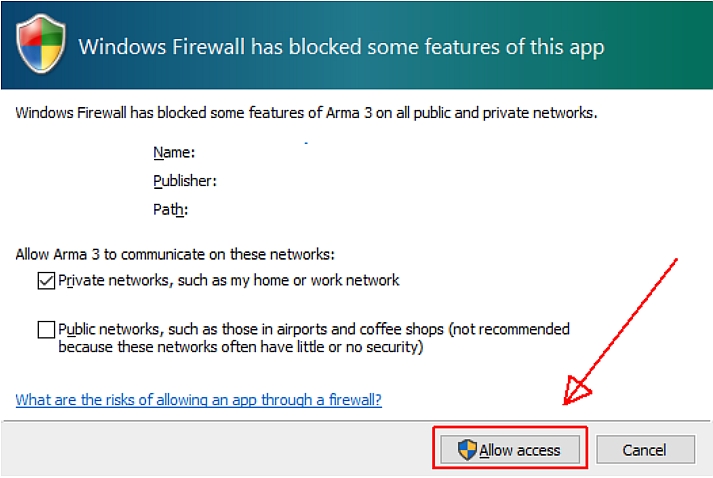
- A pop-up will flash on your screen, allow access to the Installer Software (see image below).
Running the Installer
- Ensure your WINDOWS laptop is connected to the internet as the installer is cloud based. Please ensure you have reviewed the video instructions in step 4 fully before proceeding further.
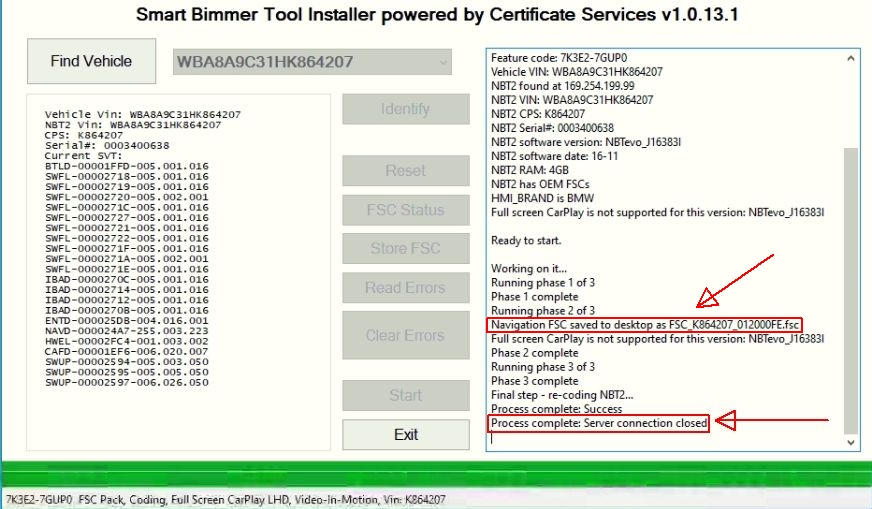
- Start the Remote Installer software and enter the code that was sent to you for starting the installer when prompted.
- Click on "Find Vehicle" and wait for VIN to be detected.
- Next click "Identify" and wait for HU to be detected.
- Finally click "Start" and wait until the process is finished and you see "Process complete: Server connection closed" message.
- Click EXIT and close the installer. Disconnect the ENET cable from your vehicle and the laptop.
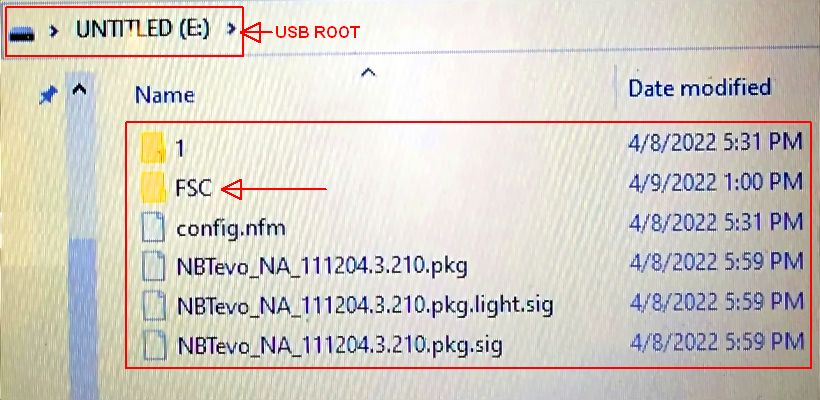
- An FSC file should be saved to your computer desktop in a folder usually called FSC (see screen shot below). It could also be stored as a file itself without the folder.
- Sometimes the folder name may also include numbers, in which case just rename the folder to FSC. DO NOT rename the file which is usually called FSC_xxx_xxx.fsc !
Preparing the USB
- Create a USB with the supplied maps by following the instructions (refer to section on creating a USB yourself if needed).
- Copy the FSC folder to the USB created in step 1 above (please ensure the folder is renamed to FSC if it has some training numbers)
- You should now have a total of 2 folders and 4 files on the root of your USB drive as below and your USB should look like the image below.
Updating the Maps
- Insert the USB drive into your car USB Port usually situated in the Centre Console under the Armrest of your car. The vehicle will recognize the new map update and prompt you to proceed.
- Once the update starts your display may go back to the default home screen.
- To go back to the "progress bar" select Map View on your Display, then press Options on your iDrive Controller followed by Navigation Map Update on the screen.
- Once the progress bar reaches 100% the display unit will automatically reboot.
- After the display unit reboots you can remove the USB. Your map update is now complete and the LifeTime FSC code has been installed.